One of the most
interesting features of Web Cartoon Maker is a support for characters.
Any now we are not talking about symbols or letters which make up
strings. We are talking about real cartoon character which can walk
talk and move their parts.
Let's look into this
example:
#include <boy.h>
void Scene1 ()
{
Boy Max;
Max.SetVisible (
true );
}
I am sure you have a lot of questions looking on this simple example.
First line of the program above contains a special directive for
compiler to include a character file "boy.h". Every character from Web
Cartoon Maker's library require
s a special file to be included. These
include
instructions always begin with a special character
#
. They usually placed at the top of your program and have a file name
embedded between symbols
<
and
>
. But how do you know what file should be included? Open your browser
(preferably Internet Explorer 7.0 or later) and navigate to the
following URL to see a list of all available characters:
http://www.webcartoonmaker.com/?art=help/lib_characters
You will see an include
file name for every character in the library. Just use the file name
for an include instruction at the top of you program.
Looking further on the above example you will notice a line
Boy Max;
. It looks pretty similar to an image or text object declaration, does
not it? The only difference is than image and text objects required a
text parameter.
This is really an object declaration! This is a declaration of a
character object
. (more formally, an “instantiation of the class Boy which is a
subclass of
IhumanCharacterSideView
. This will be discussed in more detail later. For now, just practice
saying it and sounding impressive). A Boy character object declaration
to be more specific. And Max – is an unique name for the object. You
can have more than one Boy character object in your scene. You just
need to name them differently (!!!). For example you can name a second
object Mike.
You can use all the "set", "get" and "change" methods available for
image objects with characters. As you can see we already used one of
them –
SetVisible
.
Using
a Character's Parts
But you can do more things with characters! All the characters contain
parts – arms, legs, head, eyes, mouth and other. And you can move these
parts, rotate and scale them! Actually the parts are almost like other
objects. You can access a character part using a dot symbol after an
object name. Take a look on example below:
#include <boy.h>
void Scene1 ()
{
Boy Max;
Max.SetVisible (
true );
Max.RightArm.SetAngle ( 45 );
}
Note: Once again, the poor dot gets a workout. In this case, going from
right to left, the “dot convention” uses the dot to separates the
function from the part and then the part from the name of the character
it is a part of. Although not true for any of the current characters in
the WCM library, this process could go on indefinitely. It is certainly
possible and even useful to have something like
Character.RightArm.Hand.MiddleFinger.TopJoint.SetAngle( 45 );
You can probably guess just by looking on the above example that we
change an angle of Max's right arm. The name of method we used to
change
an angle of the part is the same as we used to change an angle of
image, text and character objects. But generally speaking, the method
names available for parts are different from method names of other
objects we know about.
Let's start by learning what kinds of parts are available. Generally
speaking,
different characters may have different parts. But most of the
characters in the library are human-like. And they have the following
parts:
LeftLeg
RightLeg
Body
LeftArm
RightArm
Head
Mouth
LeftEye
RightEye
And you can use the
following "set", "get" and "change" methods with parts:
SetVisible – it works the same way as
SetVisible
for other objects. Parameter
true
means that a part will be visible. Parameter
false
means that it is going to be invisible. The only difference is that all
parts are visible by default, while other objects are not
SetShift
– it is similar to other objects'
SetPos
method. It accepts two
double
parameters – two coordinates. But these coordinates are relative to a
part's origin. The default shift coordinates are
(0,0)
. And if you want, for example, move it to the left by five pixels and
up by three, then you should supply
(-5,-3)
as parameters. Remember, all "set" methods with numerical values
actually insert a control point in the cartoon at a current time and
the values between these control points change smoothly.
SetXShift and SetYShift – as with
SetPos
these functions are very similar to
SetShift
but accept only one
double
parameter and change only one coordinate.
SetAngle – it works absolutely the same way as
SetAngle
for other kinds of objects
SetScale – it works absolutely the same way as
SetScale
for other kinds of objects
SetXScale and SetYScale – they work absolutely the same way as
SetXScale
and
SetYScale
for other kinds of objects
Let's see how you can move
a character's parts
#include <boy.h>
void Scene1 ()
{
Boy Max;
Max.SetVisible (
true );
Max.SetPos ( 0, 290
);
Max.RighArm.ChangeAngle (
360, 1 ); // rotate it clockwise
Max.RighArm.ChangeAngle (
0, 1 ); // rotate it counter
clockwise
Max.RighArm.ChangeShift ( -
50, -50, 1
); // move it left and up
Max.RighArm.ChangeShift (
0, 0, 1
); // move it back
Max.RighArm.ChangeScale (
2, 1 ); //
increase the size
Max.RighArm.ChangeScale (
1, 1 ); //
decrease it back
}
Changing
a Part's Decals
E
very part has a picture associated with it. We call these pictures
"Decals". Actually some of the parts can have multiple decals and you
can choose which one you want to show. Every decal has its own name.
The name of default decal is
"DEFAULT"
. Most of the parts have only one
"DEFAULT"
decal. But eyes and mouth have more.
LeftEye and RightEye
also have decals
"WINK1"
and
"WINK2"
.
"WINK1"
usually is a picture of a half closed eye.
"WINK2"
usually is a picture of a fully closed eye. Part
Mouth
usually has decals
"SPEAK_M"
,
"SPEAK_E"
,
"SPEAK_A"
,
"SPEAK_O"
and
"SPEAK_W"
. These are mouth pictures associated with speech. There are two more
"set" and "get" methods you can use with characters. These are:
SetDecal – accepts a
string as a parameter. It changes the decal (or picture) associated
with a part
GetDecal – accepts no
parameters and returns a string – name of the decal associated with a
part
Take a look into the following example:
#include <boy.h>
void Scene1 ()
{
Boy Max;
Max.SetVisible (
true );
Max.SetPos ( 0, 290
);
Max.Mouth.SetDecal (
"SPEAK_M" );
Sleep ( 1 );
Max.Mouth.SetDecal (
"SPEAK_E" );
Sleep ( 1 );
Max.Mouth.SetDecal (
"SPEAK_A" );
Sleep ( 1 );
Max.Mouth.SetDecal (
"SPEAK_O" );
Sleep ( 1 );
Max.Mouth.SetDecal (
"SPEAK_W" );
Sleep ( 1 );
Max.Mouth.SetDecal (
"DEFAULT" );
Sleep ( 1 );
Max.LeftEye.SetDecal (
"WINK1" );
Max.RightEye.SetDecal (
"WINK1" );
Sleep ( 1 );
Max.LeftEye.SetDecal (
"WINK2" );
Max.RightEye.SetDecal (
"WINK2" );
Sleep ( 1 );
Max.LeftEye.SetDecal (
"WINK1" );
Max.RightEye.SetDecal (
"WINK1" );
Sleep ( 1 );
Max.LeftEye.SetDecal (
"DEFAULT" );
Max.RightEye.SetDecal (
"DEFAULT" );
Sleep ( 1 );
}
Walking, Talking and Winking
As you can see, you can do
many things with the characters. But sometimes it may be little
difficult. There are several methods available with characters to
simplify most common actions – walking, talking and winking
GoesTo – it is very similar to
ChangePos
. It also accepts 3
double
parameters – a target coordinates and duration. It also changes the
time in your cartoon scene. But beside moving a character, it also
moves its parts (legs and arms) to simulate a walking pattern. You can
try the following example to see the difference:
#include <boy.h>
void Scene1 ()
{
Boy Max;
Max.SetVisible (
true );
Max.SetPos ( 200, 290
);
Max.ChangePos ( -200, 290
, 2 );
}
void Scene2 ()
{
Boy Max;
Max.SetVisible (
true );
Max.SetPos ( 200, 290
);
Max.GoesTo ( -200, 290
, 2 );
}
Says – it is a one of the most interesting methods. It accepts one
string
parameter and optionally 2 more
double
parameters. String can specify an URL of WAV file name like
"
http://www.webcartoonmaker.com/lib/sounds/people/laugh.wav"
, or, like with images, fully qualified path to a WAV file on your
computer, like
"c:\\laugh.wav"
(remember about double back slashes). Alternatively, it could be any
English text, which will be converted to audio. There are two more
double
parameters, but these are optional and you can just omit them. First of
them is an audio volume factor. When it is equal to
1
(default), the audio is playing with its original volume. If it is less
than 1, then audio is playing quieter. If it is more than 1, then audio
is playing louder. Another
double
parameter specifies how fast you want mouth decals to change during a
speech. You suppose to indicate a number of decal changes per second.
The default value is
6
which looks compilerpretty good in most cases. Please also keep in mind
that this method does not change a current scene time. You must use
function
Sleep
with approximate speech duration after using
Says
. This inconvenience is related to the fact that the compiler knows
nothing about your audio files and does not generate speech. Everything
is done in the WCM Player. Take a look into the example below:
Max.Says (
"c:\\hello.wav" );
// local file must exist
Sleep (1
);
Max.Says ( "Hello" ); // use text to speech
Sleep (1
);
Max.Says ( "Hello", 1.2
, 10 );
// same but louder and faster
Sleep (1
);
}
Winks, WinksLeft and WinksRight – you can use them with no parameters at
all or supply one
double
parameter – winking duration in seconds. Default wink duration is
0.5
seconds. Obviously, these methods make a character to wink with two or
just one eye. They also change a current time in scene:
Alan Sturgess shared an excellent video he made using Tales Animator! You can still download Tales Animator here. Unfortunately it is only available for Wi
There is a prototype of simple online character designer available
HERE. It is only a prototype,
it does not contain many pieces yet but it can already generat
Web Cartoon Maker 1.5 is finally here! You can download it
HERE!
Here is what was updated in version 1.5:
Web Cartoon Maker Desktop Edition is now fully standal

 Alan Sturgess shared an excellent video he made using Tales Animator! You can still download Tales Animator here. Unfortunately it is only available for Wi
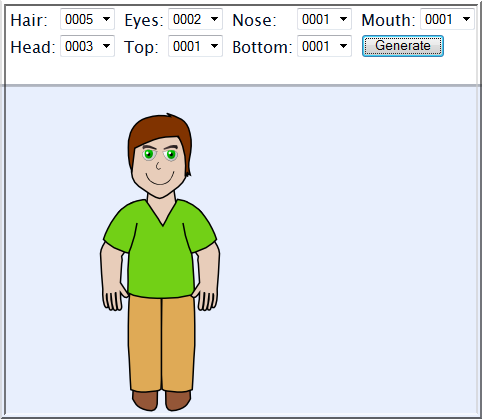 There is a prototype of simple online character designer available
HERE. It is only a prototype,
it does not contain many pieces yet but it can already generat
There is a prototype of simple online character designer available
HERE. It is only a prototype,
it does not contain many pieces yet but it can already generat Now our book "Web Cartoon Maker: A Fun Way to Learn C++" is fully in synch with WCM 1.5!
It is available for download and online reading HERE.
Now our book "Web Cartoon Maker: A Fun Way to Learn C++" is fully in synch with WCM 1.5!
It is available for download and online reading HERE.
 Web Cartoon Maker 1.5 is finally here! You can download it
HERE!
Here is what was updated in version 1.5:
Web Cartoon Maker Desktop Edition is now fully standal
Web Cartoon Maker 1.5 is finally here! You can download it
HERE!
Here is what was updated in version 1.5:
Web Cartoon Maker Desktop Edition is now fully standal